网站接入OAuth 2.0扩展协议PKCE,获取access_token实战
网站接入OAuth 2.0扩展协议PKCE,获取access_token实战
在了解了OAuth2.0的扩展协议PKCE(细节可以在由Raycast to flomo了解到OAuth 2.0之PKCE中看到),我也想试试,尝试接入一把。
使用npm包oidc-provider,具体可以源码及文档https://github.com/panva/node-oidc-provider
配置
根据文档里面的example的express简单修改下。
修改
clients: [
    {
      client_id: 'client_id',
      client_secret: 'client_secret',
      redirect_uris: ['http://127.0.0.1:3000/callback'],
      grant_types: ['refresh_token', 'authorization_code'],
      code_verifier: '2Ealc1zZfDjmm-RNct0U7POlQmj.-z9fFb2cuk4eZw_LyVZEMp2B.Uwl5t3RvX6RCovo7qkZdP6-HEh9-lQanPKrO_20j.7kyIzWc-7_Z3GB2HXmwCXkSflPh7AMJ59m',
      code_challenge: 'LVogXRp-NbtBYMm1ed88xNwvmuoanfBcbWoeKYzeOEU',
    }
],配置上code_verifier 和对应的code_challenge ,
我们可以直接在线生成 => pkce-generator
直接运行node example/express.js就可以开始调试了。
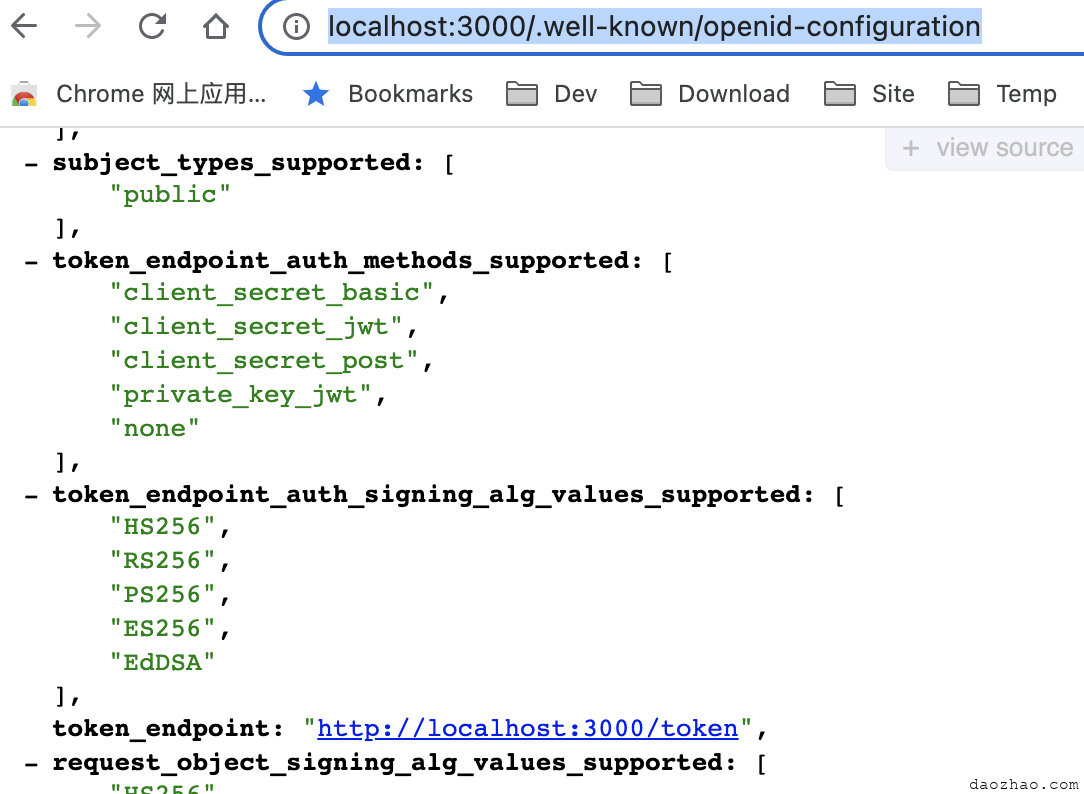
在http://localhost:3000/.well-known/openid-configuration 页面我们可以看到生效的配置和被oidc-provider接管的路由地址。
获取Authorization Code
浏览器访问 http://localhost:3000/auth?client_id=client_id&redirect_uri=http://localhost:3000/callback&response_type=code&code_challenge=LVogXRp-NbtBYMm1ed88xNwvmuoanfBcbWoeKYzeOEU&code_challenge_method=S256&scope=openid profile &nonce=123 &state=321
其中的
code_challenge_method=S256别忘了。
如果未发现报错的话,会出现这样的界面
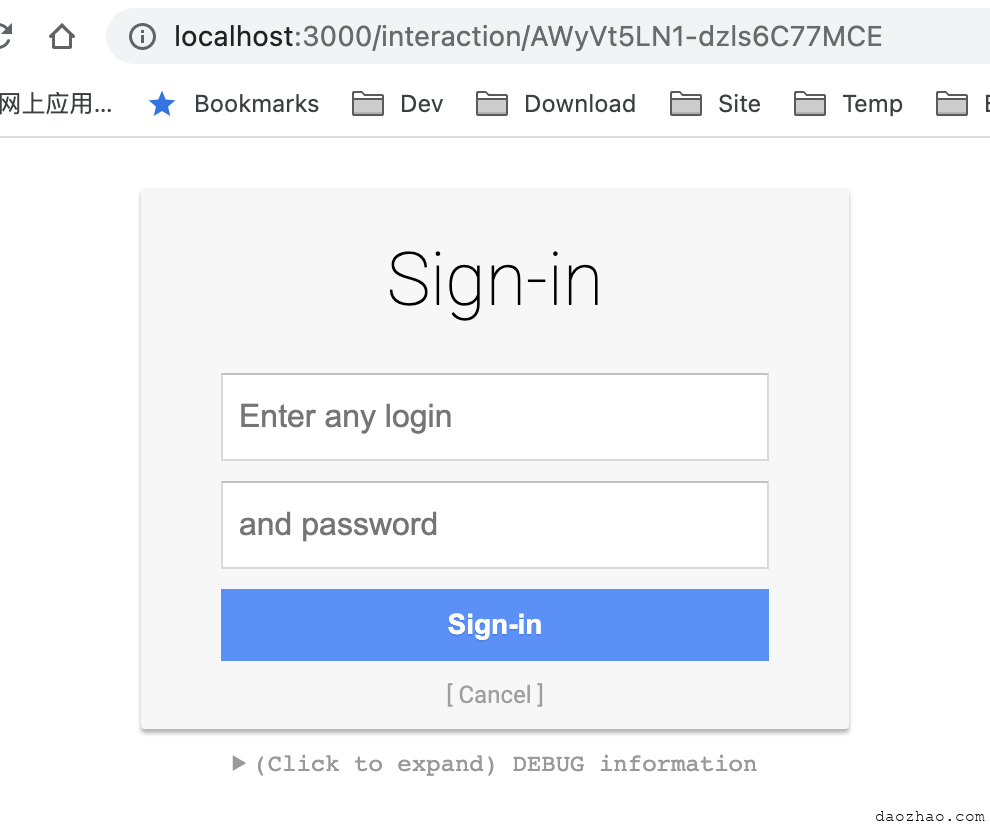
目前是没有校验登录名和密码的,随便输入即可。
点击“Sign-in”后
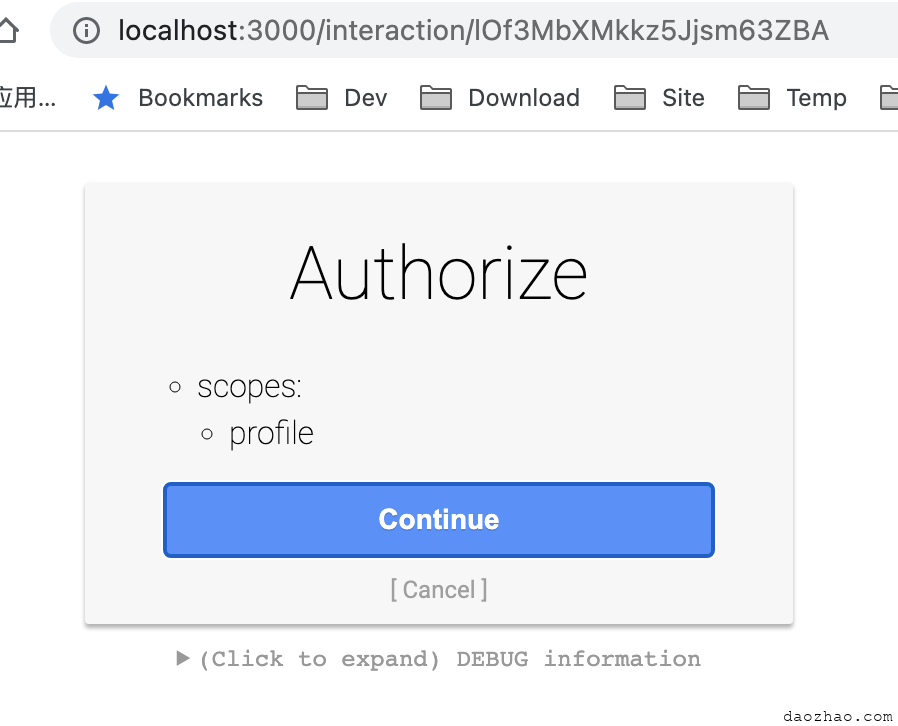
点击“Continue”后
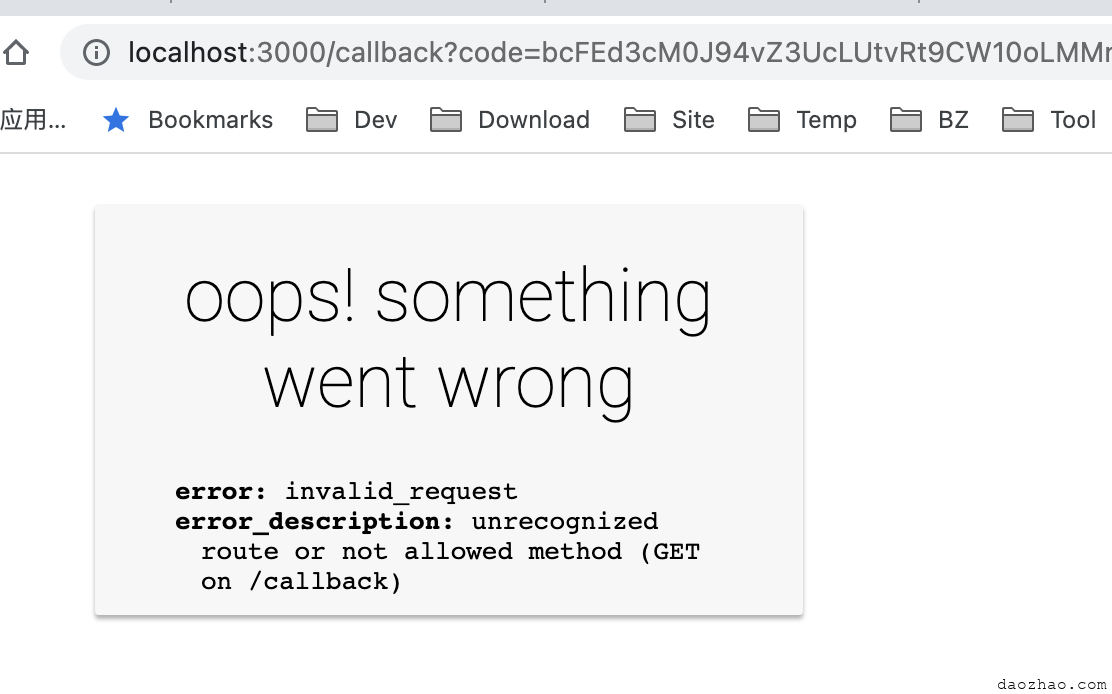
我们可以看到已经跳转到我们之前填的redirect_uris地址,并且页面上也带上了code,这个就是authorization code。
到这里已经算完成了第一步了。
这里界面上显示有错误,是因为这个/callback路由地址我们并没有进行配置,并且oidc-provider包也没有接管此路由。
获取token
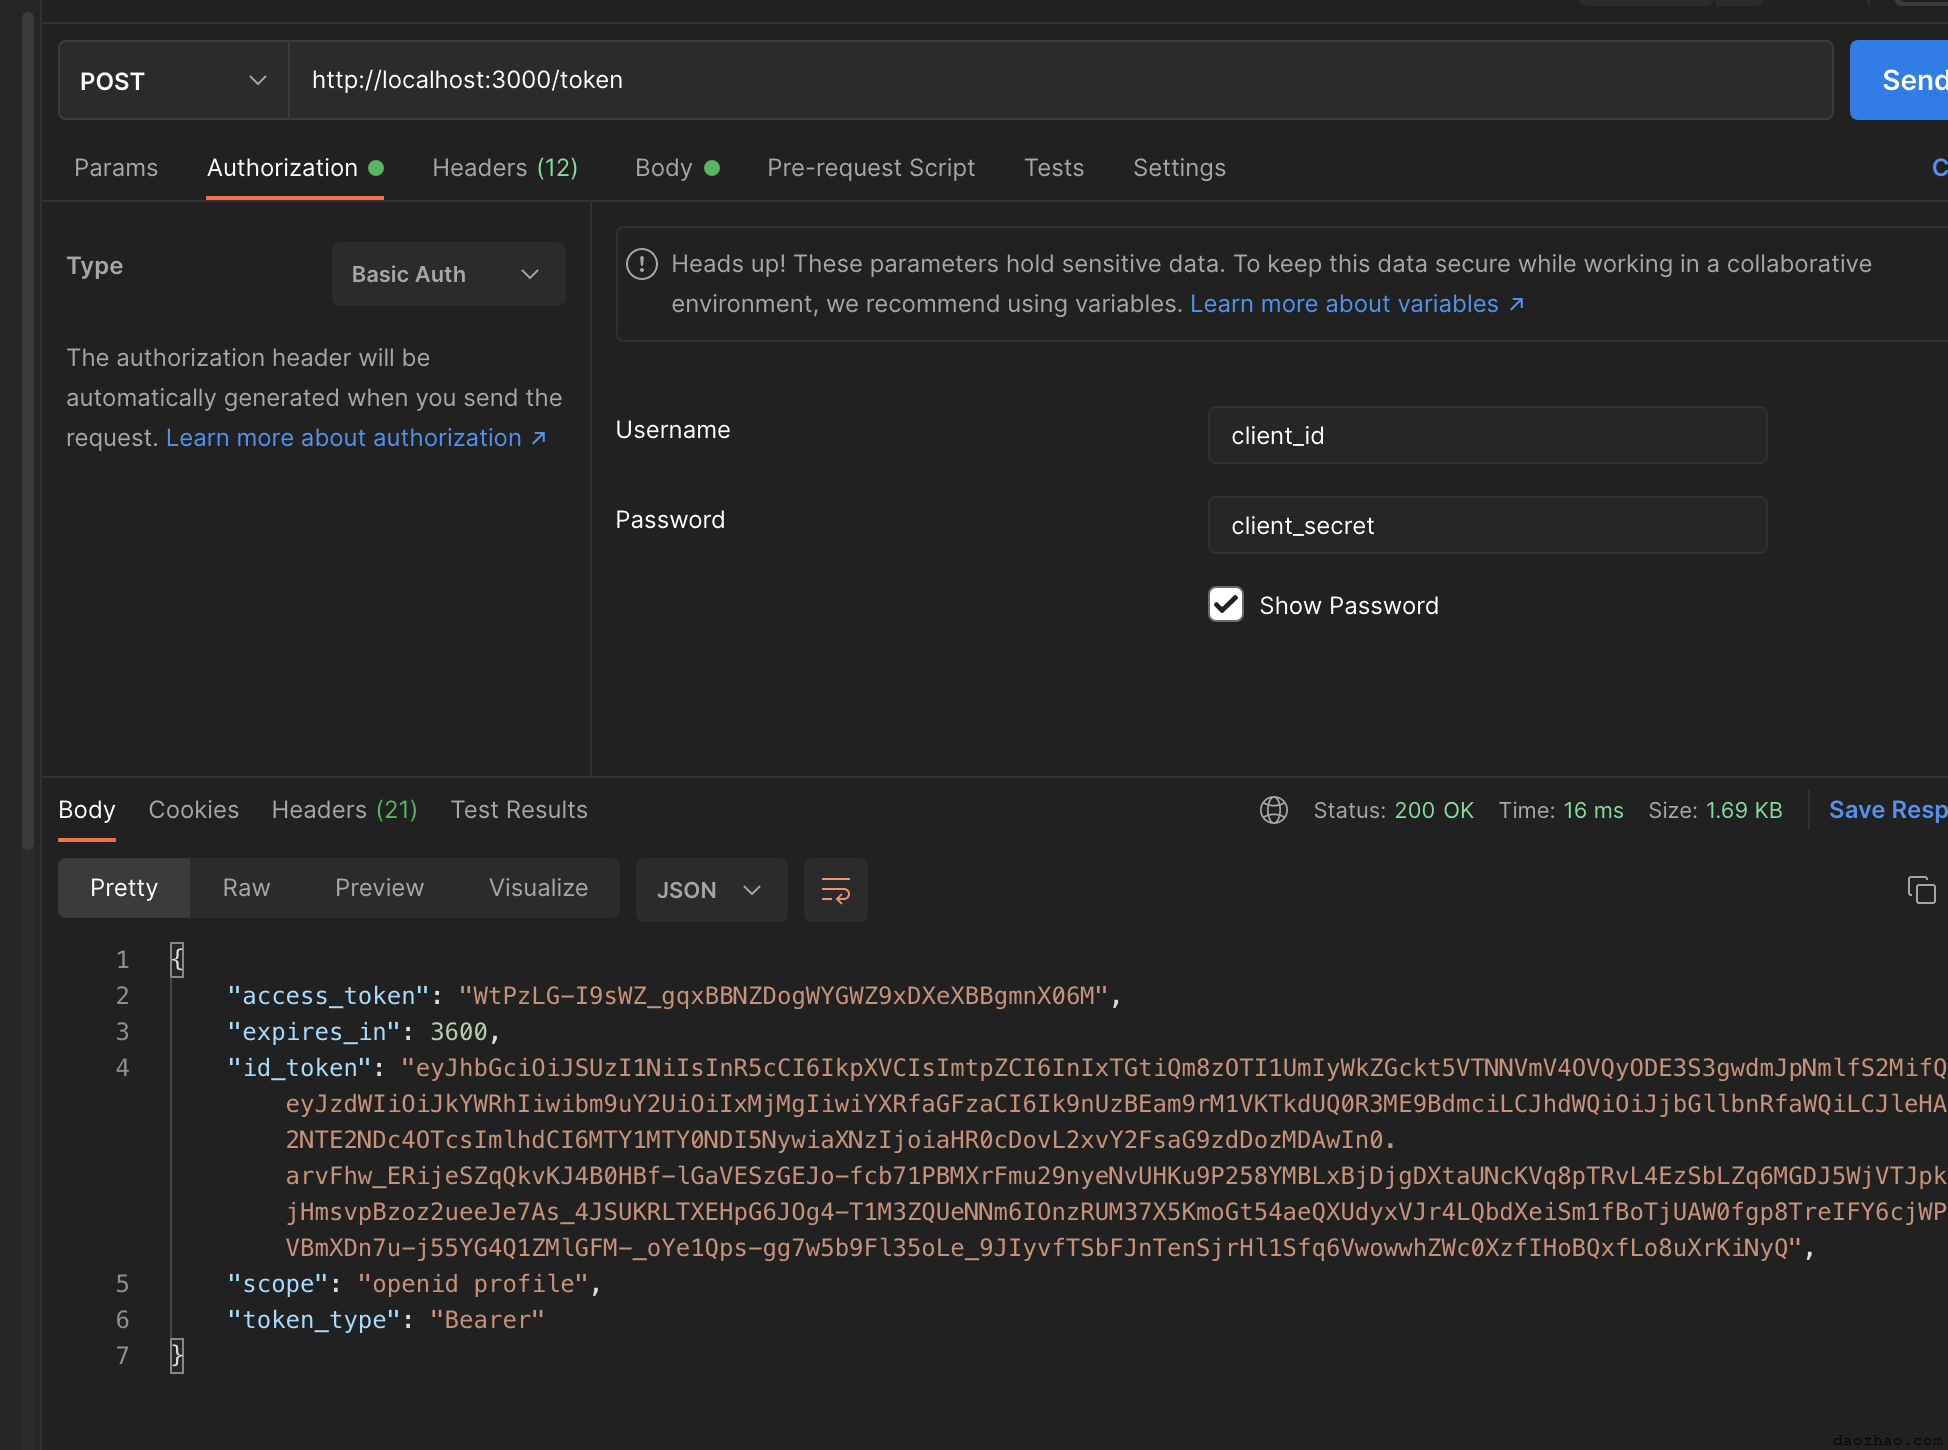
我们需要在/callback拿到的authorization code去获取最终的access_token,我们可以暂时先用postman来实现,后面会补上。
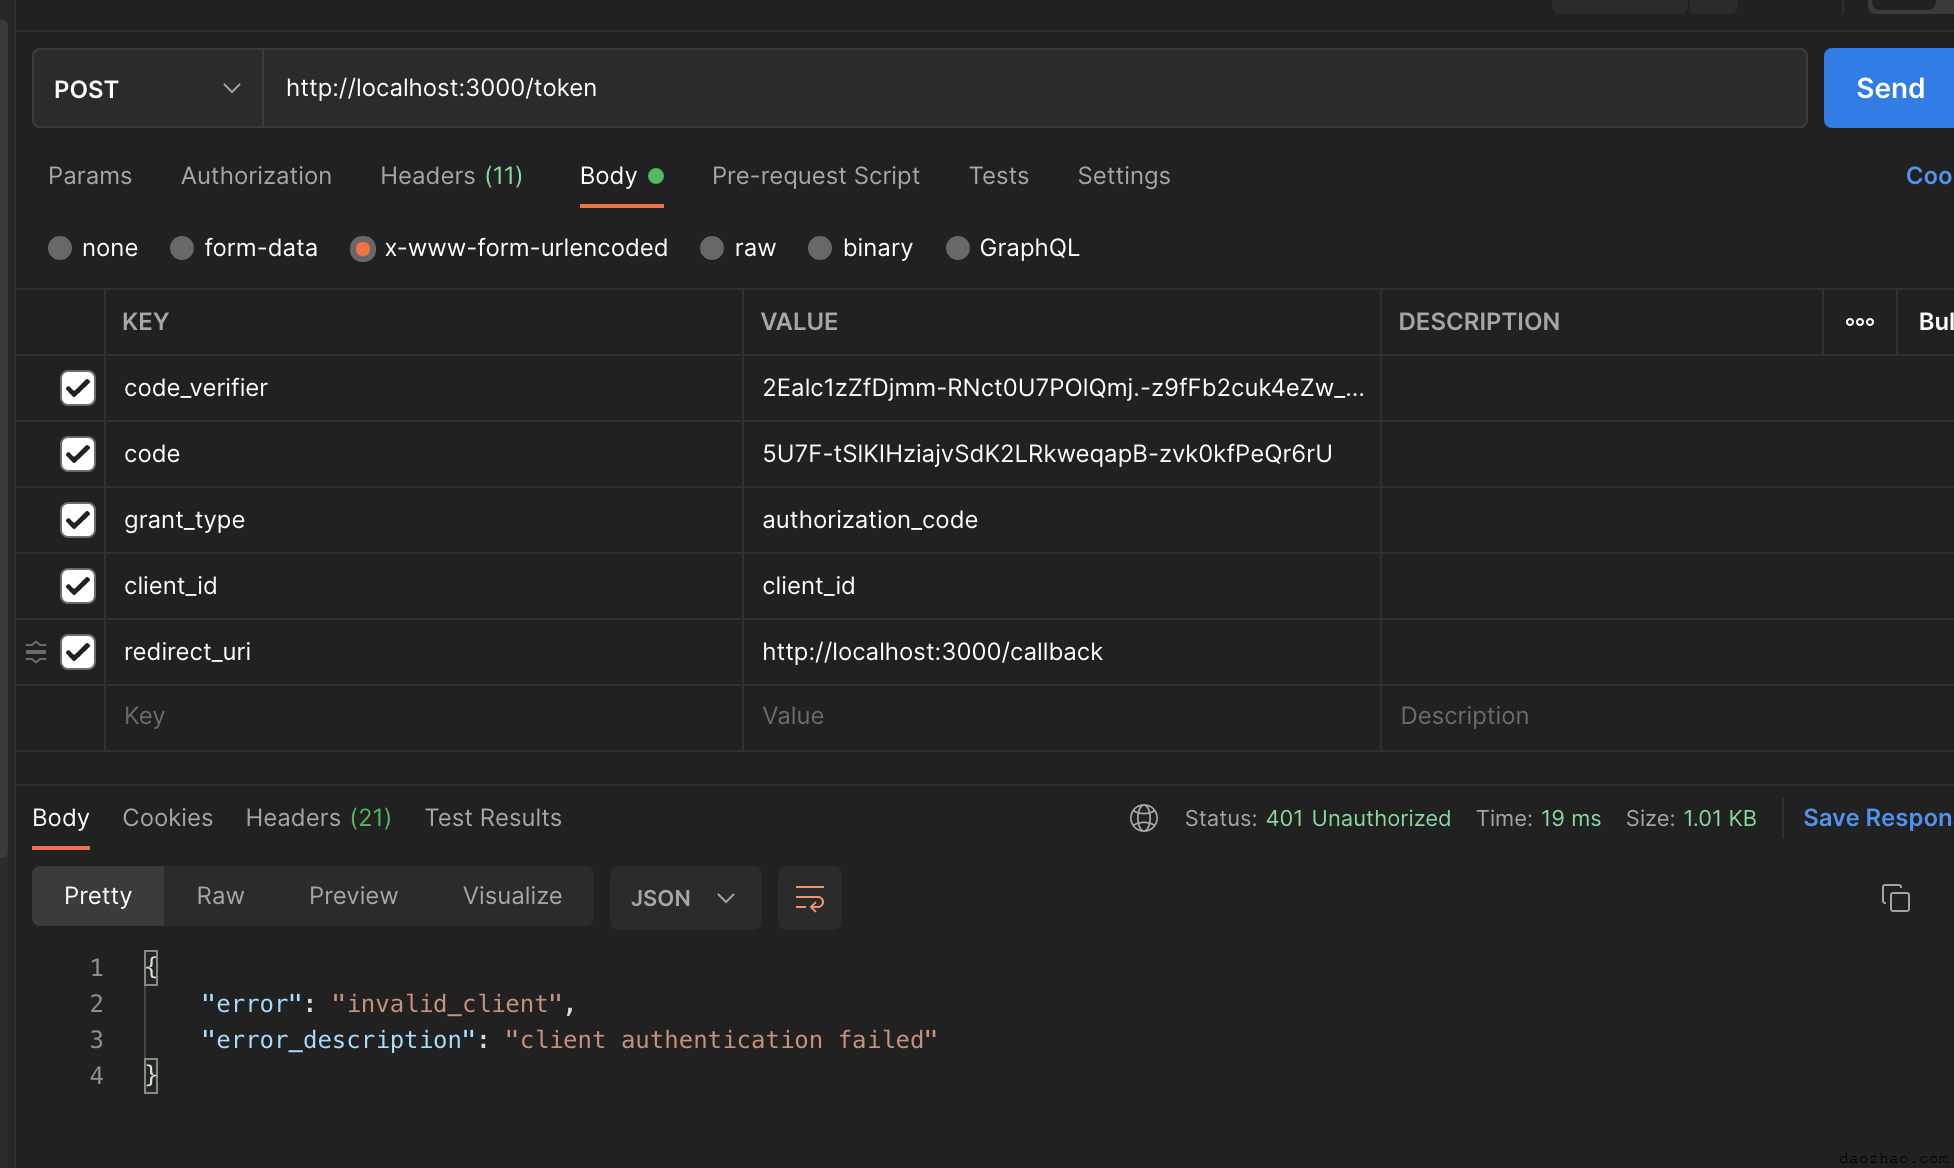
401错误?这是为什么?
我们可以自己在项目打印下出错的信息或者直接调试定位。 我们可以在example/express.js加上console
function handleClientAuthErrors({ headers: { authorization }, oidc: { body, client } }, err) {
    console.log('handleClientAuthErrors -> ',err, authorization, body, client);
  }
  provider.on('grant.error', handleClientAuthErrors);
  provider.on('introspection.error', handleClientAuthErrors);
provider.on('revocation.error', handleClientAuthErrors);因为provider会在关键节点emit消息出来,所以我们直接on一下就好
这下我们就可以看到报错的一些具体信息了
我们看到打印消息如下
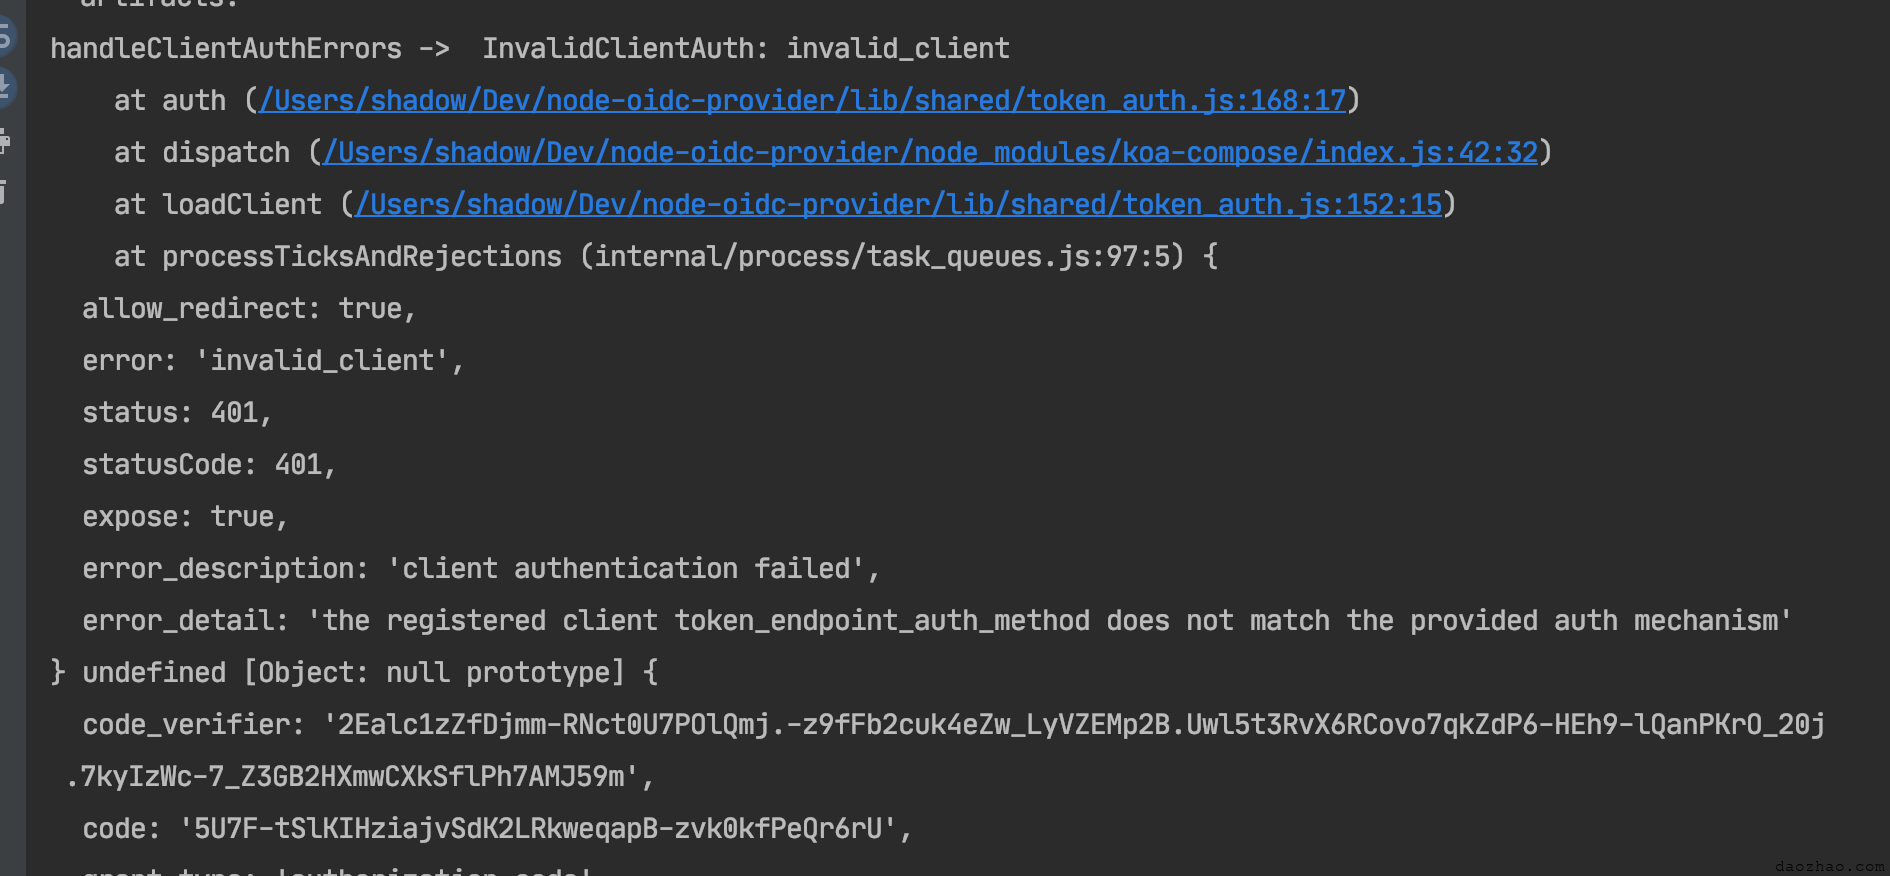
error_detail: the registered client token_endpoint_auth_method does not match the provided auth mechanism
不支持client_secret_basic ?但是我们在配置里面
 看到是支持client_secret_basic 这种方式的啊。
这个其实因为我们没有在请求头里面加上Authorization信息。
看到是支持client_secret_basic 这种方式的啊。
这个其实因为我们没有在请求头里面加上Authorization信息。
加上之后就成功了。
code换取的token
前面我们是用postman调用的/token用authorization code换取的access_token,现在我们加上自己的/callback路由实现,以方便在/callback直接完成换取access_token过程。
// /example/routes/express.js
const querystring = require('querystring');
const base64url = require('../../lib/helpers/base64url');

app.get('/callback', (req, res) => {
    const data = {
      code: req.query.code,
      code_verifier: '2Ealc1zZfDjmm-RNct0U7POlQmj.-z9fFb2cuk4eZw_LyVZEMp2B.Uwl5t3RvX6RCovo7qkZdP6-HEh9-lQanPKrO_20j.7kyIzWc-7_Z3GB2HXmwCXkSflPh7AMJ59m',
      grant_type: 'authorization_code',
      client_id: 'client_id',
      redirect_uri: 'http://localhost:3000/callback',
    };
    axios.post('http://localhost:3000/token', querystring.stringify(data), {
      headers: {
        authorization: `Basic ${base64url.encode('client_id:client_secret')}`,
        'content-type': 'application/x-www-form-urlencoded',
      },
    }).then((result) => {
      console.log(result.data);
      res.send(result.data);
    }).catch((err) => {
      console.log('err -> ', err);
      res.send('error');
    });
成功完成用authorization code换取的access_token过程,有了access_token,后续就都有权限了。
补充
目前oidc-provider官方的example是允许随便输入登录名和密码,因为为了让大家快速上手,在配置里面的findAccount写的是永远都是查找到账号
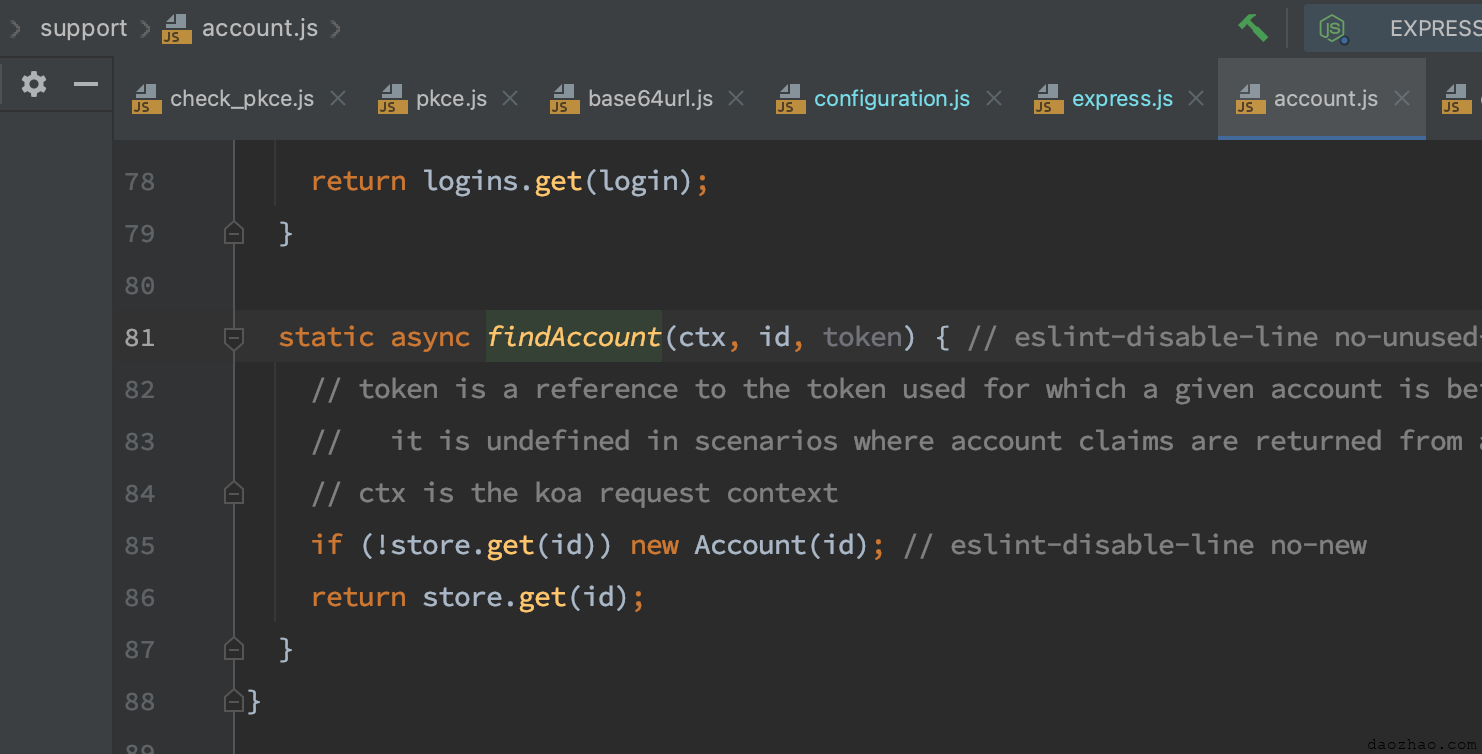
具体代码在
example/support/accout.js
这里即使找不到id也会重新生成一个Account,所以始终能成功。
- 分类:
- Web前端
相关文章
不知道自己腾讯微博,新浪微博等微博的Access token和Token secret请进
为什么我使用该插件授权时总是失败,不能绑定帐号啊? 首先查看你主机是否支持curl_init()函数和 openssl_open()函数,如果不支持将导致得不到oauth token值,会影响使 阅读更多…
由Raycast to flomo了解到OAuth 2.0之PKCE
五一期间在flomo官网的扩展中心看到了这个 Raycast to flomo ,对Mac上的效率工具有了点了解,我直接基本都没有用过Mac自带的spotlight。。。 我好奇的不是竟 阅读更多…