从vuecli3学习webpack记录(二)webpack分析
从vuecli3学习webpack记录(二)webpack分析
上一篇里面讲到运行npm run serve时运行的是serveice.run(comand, args, rawArgv)并且提到它提示返回的是一个promise,所以后面还接着.catch(err => {...});
run方法里面是
return fn(args, rawArgv);而fn就是registerCommand (name, opts, fn)的第三个参数,对于特定的npm run serve就是这样
// lib/commands/serve.js
api.registerCommand('serve', {
    description: 'start development server',
    usage: 'vue-cli-service serve [options] [entry]',
    options: {
      '--open': `open browser on server start`,
      '--copy': `copy url to clipboard on server start`,
      '--mode': `specify env mode (default: development)`,
      '--host': `specify host (default: ${defaults.host})`,
      '--port': `specify port (default: ${defaults.port})`,
      '--https': `use https (default: ${defaults.https})`,
      '--public': `specify the public network URL for the HMR client`
    }
  }, async function serve (args) {
    info('Starting development server...')
    ...
    return new Promise((resolvfe, reject)){

    })
})
这也就是之前为什么说返回的是promise了。
在api.registerCommand的第三个参数里面,会引用webpack,获取比校验webpack的配置项,还会new一个WebapckDevServer的实例。
webpack在获取其配置参数时还是做了很多事的,我们有必要先看一下。
// lib/commands/serve.js
const webpackConfig = api.resolveWebpackConfig()

// check for common config errors
validateWebpackConfig(webpackConfig, api, options)
// lib/PluginAPI.js
resolveWebpackConfig (chainableConfig) {
return this.service.resolveWebpackConfig(chainableConfig)
}可以看出上面的api.resolveWebpackConfig实际上还是调用的service里面的resolveWebpackConfig方法
// lib/Service.js
resolveWebpackConfig (chainableConfig = this.resolveChainableWebpackConfig()) {
if (!this.initialized) {
throw new Error('Service must call init() before calling resolveWebpackConfig().')
}
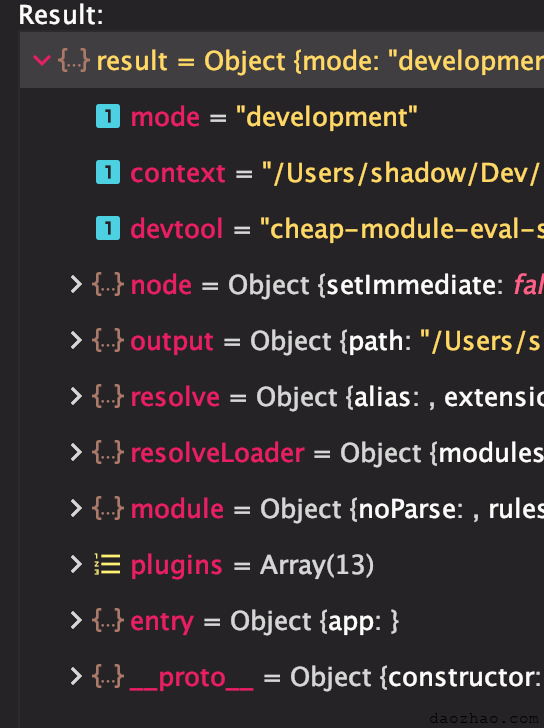
// get raw config
let config = chainableConfig.toConfig()
const original = config
// apply raw config fns
this.webpackRawConfigFns.forEach(fn => {
if (typeof fn === 'function') {
// function with optional return value
const res = fn(config)
if (res) config = merge(config, res)
} else if (fn) {
// merge literal values
config = merge(config, fn)
console.log('merged config -> ', config !== original);
}
})
// #2206 If config is merged by merge-webpack, it discards the __ruleNames
// information injected by webpack-chain. Restore the info so that
// vue inspect works properly.
if (config !== original) {
cloneRuleNames(
config.module && config.module.rules,
original.module && original.module.rules
)
}
// check if the user has manually mutated output.publicPath
const target = process.env.VUE_CLI_BUILD_TARGET
if (
!process.env.VUE_CLI_TEST &&
(target && target !== 'app') &&
config.output.publicPath !== this.projectOptions.publicPath
) {
throw new Error(
`Do not modify webpack output.publicPath directly. ` +
`Use the "publicPath" option in vue.config.js instead.`
)
}
// entry会被统一转换为数组形式并存储在process.env.VUE_CLI_ENTRY_FILES
if (typeof config.entry !== 'function') {
let entryFiles
if (typeof config.entry === 'string') {
entryFiles = [config.entry]
} else if (Array.isArray(config.entry)) {
entryFiles = config.entry
} else {
entryFiles = Object.values(config.entry || []).reduce((allEntries, curr) => {
return allEntries.concat(curr)
}, [])
}
entryFiles = entryFiles.map(file => path.resolve(this.context, file))
process.env.VUE_CLI_ENTRY_FILES = JSON.stringify(entryFiles)
}
return config
}在我们没有传参数chainableConfig的时候,会使用默认值,也就是this.resolveChainableWebpackConfig方法返回的结果
我们接着看resolveChainableWebpackConfig()
// lib/Service.js
resolveChainableWebpackConfig () {
    const chainableConfig = new Config()
    // apply chains
    this.webpackChainFns.forEach(fn => fn(chainableConfig))
    return chainableConfig
}大家还记得上一篇里面讲道run方法之前会运行一个init方法,它里面会进行一系列的初始化操作:
1.获取用户的配置(vue.config.js里面的) 2.将默认的配置和用户配置合并得到最终的项目配置,也就是Service里面的
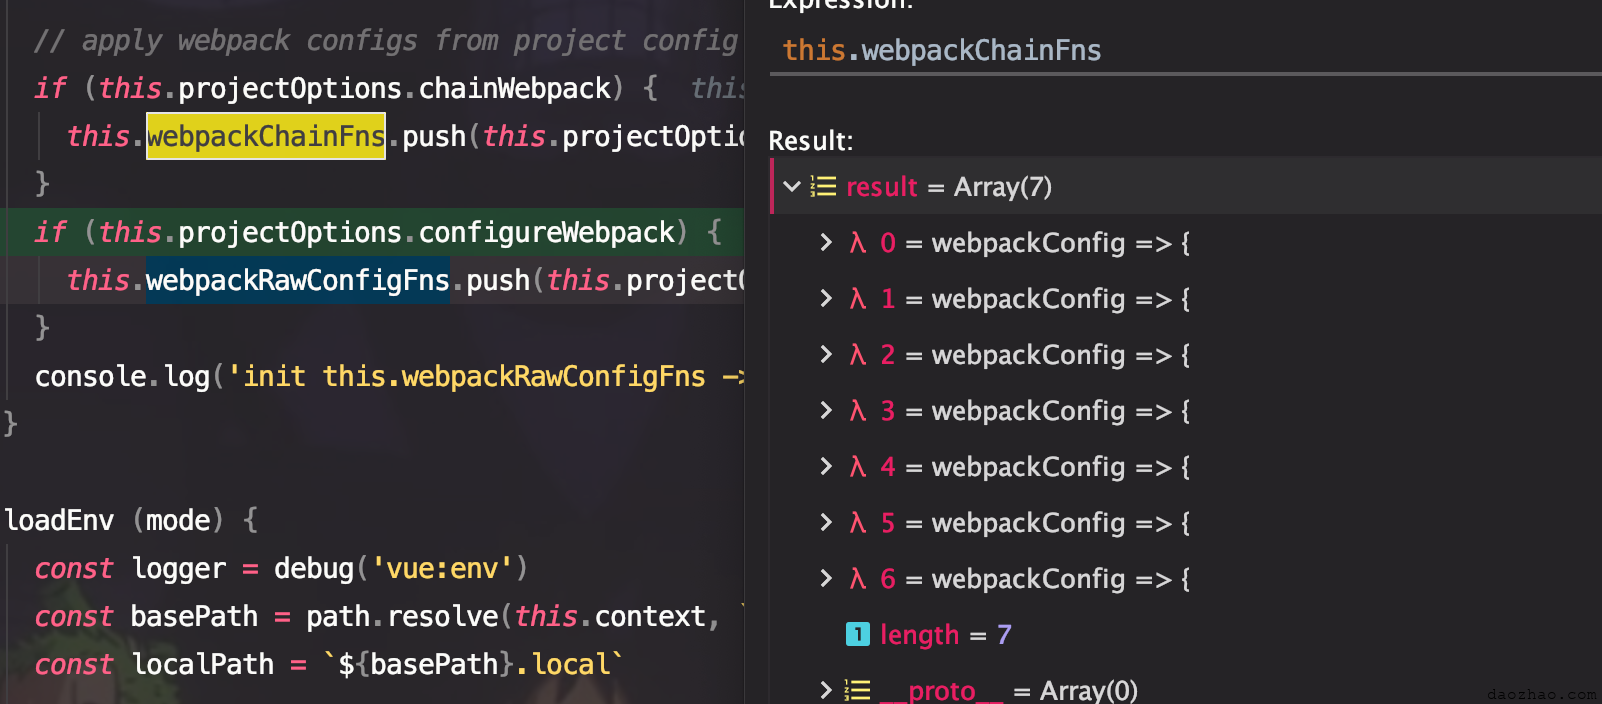
this.projectOptions3.if (this.projectOptions.chainWebpack) { this.webpackChainFns.push(this.projectOptions.chainWebpack) } if (this.projectOptions.configureWebpack) { this.webpackRawConfigFns.push(this.projectOptions.configureWebpack) }
根据断点可以看到这时的
this.projectOptions.chainWebpack是undefinded。注:原型链上也没有这两个属性
但是this.webpackChainFns里面确有值,是个长度为7的数组
 这时因为在Services里面的init方法时有个如下操作
this.plugins.forEach(({ id, apply }) => {
    apply(new PluginAPI(id, this), this.projectOptions)
})
对应在lib/config文件夹的js文件时执行的
chainWebpack (fn) {
    console.log(' chainWebpack-> id', this.id);
    this.service.webpackChainFns.push(fn)
  }
原来是在里push进去了。
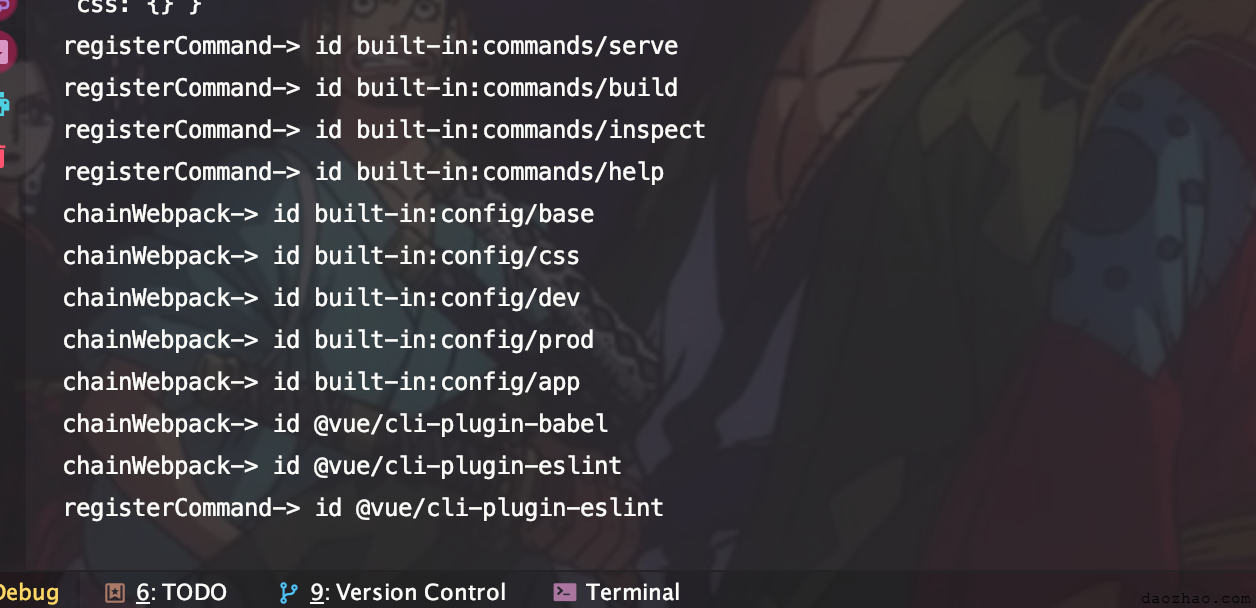 config文件夹里面5个,再加@vue/cli的两个,刚好7个。
现在终于可以回到开始讲到resolveChainableWebpackConfig方法了
// lib/Service.js
resolveChainableWebpackConfig () {
    const chainableConfig = new Config()
    // apply chains
    this.webpackChainFns.forEach(fn => fn(chainableConfig))
    return chainableConfig
}forEach使得webpackChainFns数组里面的7个各执行了一遍,里面看了什么?对生成·的chainableConfig干了什么?这个我们有机会再讲,
这里的chainableConfig返回作为resolveWebpackConfig的第一个参数chainableConfig
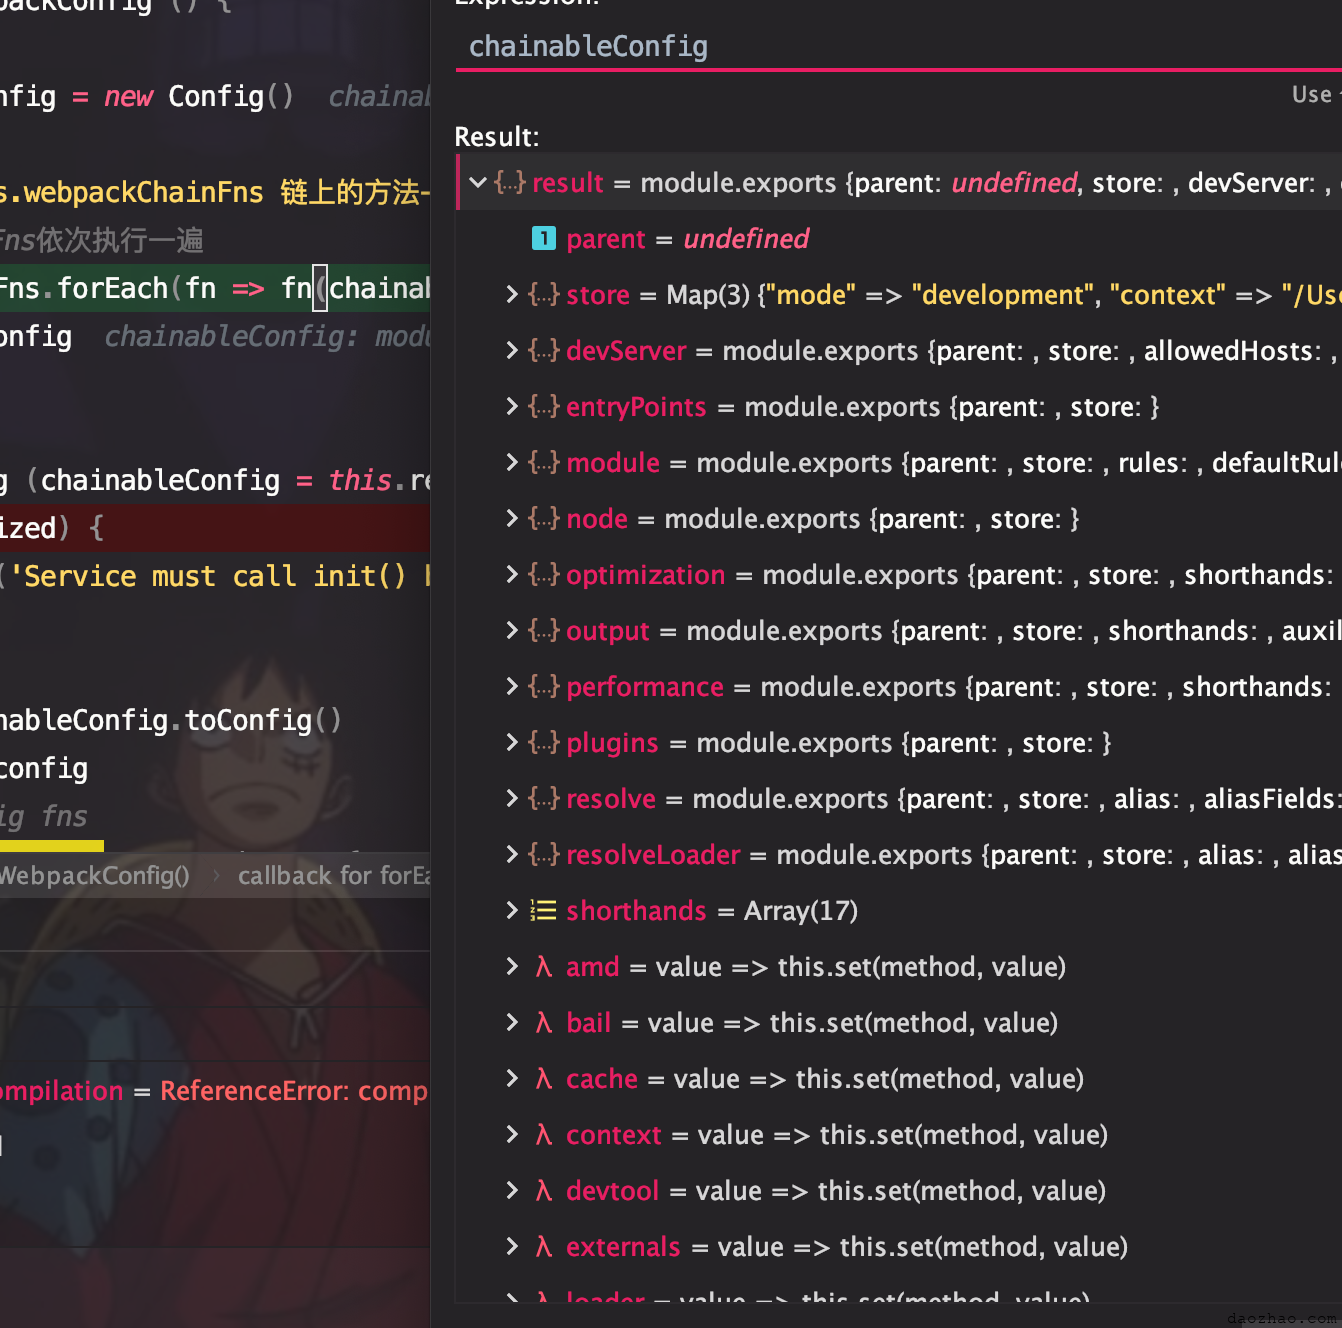 这里面已经一堆内容了
在方法
这里面已经一堆内容了
在方法resolveWebpackConfig中
let config = chainableConfig.toConfig()
...在循环this.webpackRawConfigFns时不断合并config
最后返回配置confg
 webpack会执行
webpack(webpackConfig)返回一个compiler
// node_modules/webpack/lib/webpack.js
const webpack = (options, callback) => {
const webpackOptionsValidationErrors = validateSchema(
webpackOptionsSchema,
options
);
if (webpackOptionsValidationErrors.length) {
throw new WebpackOptionsValidationError(webpackOptionsValidationErrors);
}
let compiler;
if (Array.isArray(options)) {
compiler = new MultiCompiler(options.map(options => webpack(options)));
} else if (typeof options === "object") {
options = new WebpackOptionsDefaulter().process(options);
compiler = new Compiler(options.context);
compiler.options = options;
new NodeEnvironmentPlugin().apply(compiler);
if (options.plugins && Array.isArray(options.plugins)) {
for (const plugin of options.plugins) {
// 执行webpackConfig的每个插件,调用call/apply方法
if (typeof plugin === "function") {
plugin.call(compiler, compiler);
} else {
plugin.apply(compiler);
}
}
}
compiler.hooks.environment.call();
compiler.hooks.afterEnvironment.call();
compiler.options = new WebpackOptionsApply().process(options, compiler);
} else {
throw new Error("Invalid argument: options");
}
if (callback) {
if (typeof callback !== "function") {
throw new Error("Invalid argument: callback");
}
if (
options.watch === true ||
(Array.isArray(options) && options.some(o => o.watch))
) {
const watchOptions = Array.isArray(options)
? options.map(o => o.watchOptions || {})
: options.watchOptions || {};
return compiler.watch(watchOptions, callback);
}
compiler.run(callback);
}
return compiler;
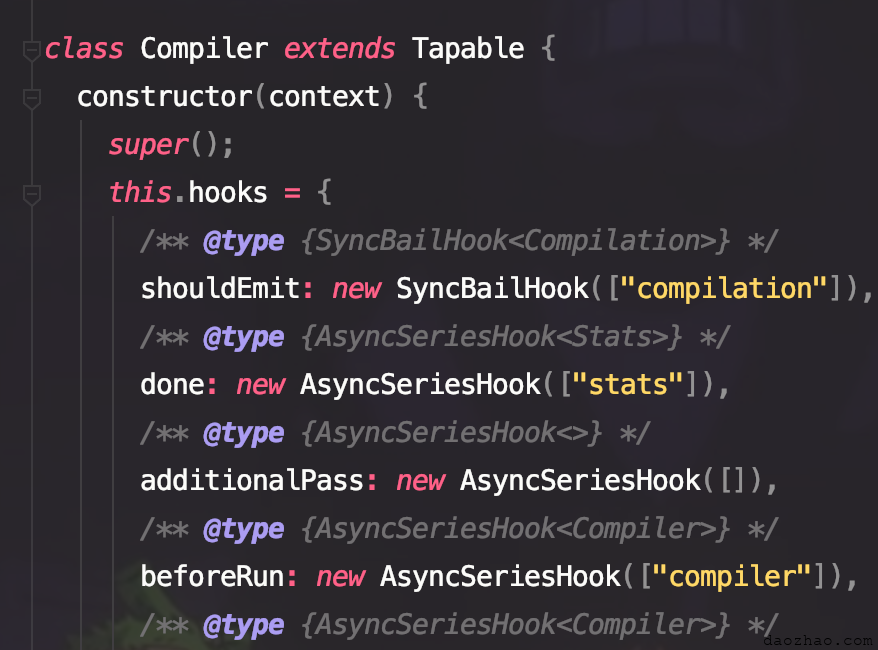
};complier里面有个hooks对象,里面的每一个值都是一个Hook实例
 正是因为这样我们才能在
vue-cli-service serve返回的promise里面进行下面的操作
return new Promise((resolve, reject) => {
      // log instructions & open browser on first compilation complete
      let isFirstCompile = true
      compiler.hooks.done.tap('vue-cli-service serve', stats => {
        if (stats.hasErrors()) {
          return
        }

        let copied = ''
        if (isFirstCompile && args.copy) {
          try {
            require('clipboardy').writeSync(urls.localUrlForBrowser)
            copied = chalk.dim('(copied to clipboard)')
          } catch (_) {
            /* catch exception if copy to clipboard isn't supported (e.g. WSL), see issue #3476 */
          }
        }
        ...
        resolve({
            server,
            url: urls.localUrlForBrowser
          })
    })
}具体关于Hook 的下篇分析。
- 分类:
- Web前端
相关文章
从vuecli3学习webpack记录(零)整体流程
今天看了下自己之前写的从vuecli3学习webpack记录系列,感觉自己居然没有在一开始的时候把vuecli的 npm run serve 的整体流程在一篇文章里面完整的讲完,可能是因为打字打的手 阅读更多…
用webpack的require.context优化vue store和router文件
早期右边博文专门讲了下require.context的用法和简单用法介绍《用webpack的require.context() 简化你的代码》 这次说点自己在vue项目中的具体应用吧 store 阅读更多…
用webpack的require.context() 简化你的代码
随着我们的项目越来越大,平时的常见用操作就会觉得很‘麻烦’了,比如每次要添加新的路由, vuex里面添加新的module等 { name: 'moduleN', 阅读更多…
webpack笔记——在html-webpack-plugin插件中提供给其它插件是使用的hooks
最近在这段时间刚好在温故下webpack源码,webpack5都出来了,4还不再学习下? 这次顺便学习下webpack的常用插件html-webpack-plugin。 发现这个插件里面还额外加入了 阅读更多…
怎么调试Webpack+React项目,报错basedir=$(dirname "$(echo "$0" | sed -e 's,\\,/,g')")怎么办
今天在WebStorm上Windows上准备调试一个React项目,就出现了这样的报错。 Node Parameters里面写的是webpack-dev-server的执行文件 .\node_mod 阅读更多…
从vuecli3学习webpack记录(一)vue-cli-serve机制
最近看了看vuecli3,把自己的学习记录下来。 首先看入口 npm run dev 即是 vue-cli-service serve ,之所以能运行 vue-cli-service 命令,就是 阅读更多…